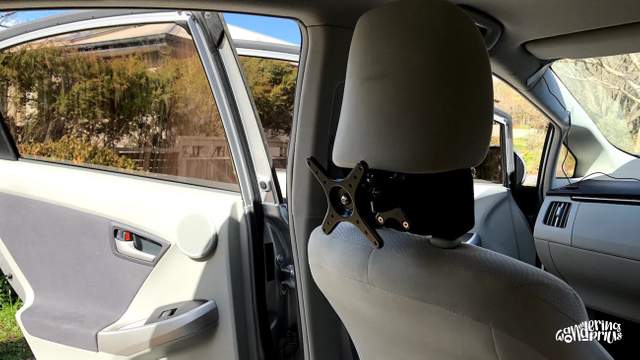
One of the items on our wishlist for a while was the ability to have a second monitor setup while working. For this trip, we decided to look into how we could pull it off. For our final product, we ended up with a 15-inch portable monitor, a VESA wall monitor mount, plus a custom build for attaching it to the car headrest.

The first problem we looked at was deciding on the correct monitor. This needed to fulfil the requirements of being light, having a VESA mount, low power requirements, and the right size for the space. A portable monitor seemed to be the way to go after looking at a few options. They are designed to be taken around with you and set up on a desk next to a laptop. Another big plus was the power consumption. Portable monitors are usually powered over USB, meaning there is only one cable to plug in to get power plus connect it to your device. The monitor we settled on draws 8w of power from the device it is plugged into, the laptop.
We ended up going with a AOC 15.6" E1659FWU Portable USB Power LED Monitor, that we picked up new for about $160AUD. This works on Ska’s MSI laptop fine, and with a little download, it also works on my MBP via the UCB-C slot.
The next item we needed to buy was the VESA wall mount. The idea here is that we’ll use this mount to attach the monitor to a flat surface (a block of wood in our case). The flat surface would be mounted to the headrest (will explain that next). We looked at a few mounts, and just needed to make sure it would fit in the space we had, that was limited by the way we were attaching it to the headrest. Also wanted to make sure we got something that did not stick out too much from the back of the chair. This was for practical purposes when using the monitor, also when driving you don’t want something that will move around too much.
We went with this option from eBay 10-27" LCD LED TV Monitor Wall Mount VESA Bracket Stand with Swivel Arms & Tilt. It cost $28AUD all up. It is simple, small, and very sturdy for the ‘portable monitor’ scenario we had instore for it.
The last part of getting this setup was the mount to the headrest. The idea was based off an Instructables link showing what we wanted to do. In order to use some items I already had, I opted to make the main block in wood. I just trimmed up some I already had in the garage. Given I had a thick piece of wood to work with, I also opted to use a single piece and just bore 2 holes for the headrest stems to slide through.
After measuring the stems on the headrest, I went and got a 16mm spade drill bit from Bunnings for $10 to drill the holes. My biggest worry here was being able to keep the drill bit parallel while drilling 2 holes over 100mm in depth. If I was off by a few degrees then I would probably bust out the sides of the wood. I cut a couple of extra pieces while I had the table saw out just in case this happened. My bit was also 1mm bigger than the headrest stems to allow for a bit of tolerance. After securing the piece of wood, and doing my best to keep everything straight I luckily managed to drill both holes straight and parallel, and they fit onto the headrest, the first time.
Once the wood was cut and drilled, the next step was to cover it in some foam and material. This makes it look a bit nicer, but also covers any sharp edges. Given where it was going to be mounted, it also makes it more comfortable for the passenger. The foam was off-cuts from our car mattress. Then the material was off-cuts from our curtain we put up each night. With a bit of cutting plus the use of a staple gun, the trimmings were complete.
The mount got attached, the VESA portion got attached to the monitor and then the whole thing was installed in the car. In total, it was probably a couple of hours of work to get it all together and cost just under $200. Definitely not a bad little addition to the car.
What would I change about the build?
After completing this build I did have the thought that the block of wood does make the headrest a bit high. A way around this could be to have a shorter portion that sticks under the headrest, connected to a larger flat surface to screw the mount to. This would require a little more work while making the wood portion, but I think the result would be worth it.